The
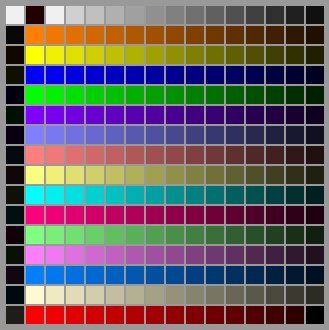
The source PICT file must be a 256 (8 bit) color image which
uses the Ares

These are the only 256 colors allowed for use in sprites.
You can use a program like Photoshop, Debabelizer, or the shareware GraphicConverter (www.graphicconverter.net) to convert your source image from 16 or 24 bit to 8-bit using the required Ares colors.
For example, here's how to convert your image to Ares' color table with GraphicConverter:
1. Open the source image.
2. If the image is already 8-bit but not using Ares' color table, select
Picture ->Colors ->Change to 32768 Colors .3. Select
Picture ->Colors ->Options 4. When the
Options for Color Reduction dialog box comes up, check theUse Custom Color Table option, then click theOpen... button.5. Select the Ares Color Table file included with Hera.
6. Make sure the
Dither option is not checked.7. Click
OK 8. Select
Picture ->Colors ->Change to 256 Colors .9. Save the image under a different name (like "my sprite 8-bit.pct") in case there was a problem.
Each frame of the sprite must be laid out in an imaginary grid in the source image. The grid can have multiple rows and columns.
There can be no graphics in the source image except the desired sprite against a solid background. The grid lines in the Sprite Importer are added by Hera for clarity.
|
|
|
|
The cells of the grid must be square (having the same height and width). There can be no unused border space in the source image -- that is, the size of the image should be evenly divisible by the size of the imaginary grid.
|
|
|
|
The position of the graphic in the imaginary grid square is important, especially for rotating objects (like most ships). Sprites are drawn relative to their center point. The center point is taken from the position of the source graphic in the imaginary grid square.
|
|
|
|
When Hera creates the sprite, it uses the upper right corner
of the source graphic to determine what the background color of
the source image is. Then, every
It is essential that you ensure that the background color is a pure solid color among the legal 253 colors (all of Ares colors except black, white, or 100% red). Pure green and pure blue are good choices.
|
|
|
|
|
|
|
|
Once you have created a source image, importing it is easy.
The Sprite Importer can only be accessed from the
Clicking on the
After you choose the source file, the graphic is opened in the Sprite Importer window. If the graphic is too large, it may appear scaled down -- this will not affect the actual size of the sprite. The image shown is only for reference.
Enter the number of columns in the imaginary grid. This determines the size of the grid squares. For example, if your grid squares were 60 by 60 pixels, and your image was 600 pixels wide, you'd enter 10.
Enter the total number of sprite frames, or cells of the imaginary grid, you want to use. For example, if you had 24 frames of animation and 60 by 60 pixel grid squares, and your image was 600 pixels, or 10 cells wide, you'd have several unused cells. Unused cells will appear with a red X in them.
Once you've entered the correct values in the two fields, press the OK button.